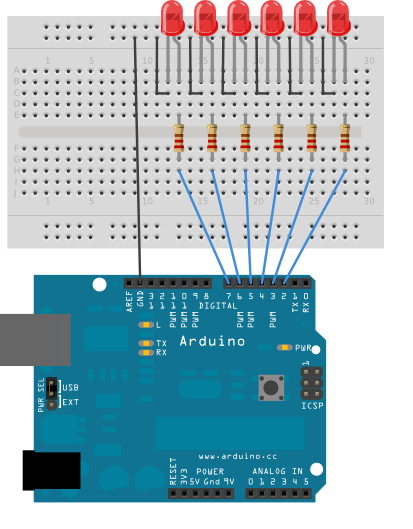
This example blinks 6 LEDs attached the Arduino by using a for() loop to cycle back and forth through digital pins 2-7. The LEDS are turned on and off, in sequence, by using both the digitalWrite() and delay() functions .
Hardware Requirements :
* Arduino Board
* (6) 220 ohm resistors
* (6) LEDs
* hook-up wire
* breadboard
Circuit :
Code :
int timer = 100; // The higher the number, the slower the timing.
void setup() {
// use a for loop to initialize each pin as an output:
for (int thisPin = 2; thisPin < 8; thisPin++) {
pinMode(thisPin, OUTPUT);
}
}
void loop() {
// loop from the lowest pin to the highest:
for (int thisPin = 2; thisPin < 8; thisPin++) {
// turn the pin on:
digitalWrite(thisPin, HIGH);
delay(timer);
// turn the pin off:
digitalWrite(thisPin, LOW);
}
// loop from the highest pin to the lowest:
for (int thisPin = 7; thisPin >= 2; thisPin--) {
// turn the pin on:
digitalWrite(thisPin, HIGH);
delay(timer);
// turn the pin off:
digitalWrite(thisPin, LOW);
}
}
(Source : www.arduino.cc)

No comments:
Post a Comment