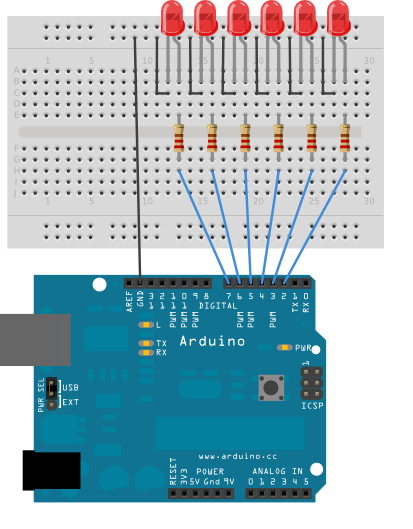
This example shows you how you can turn on a sequence of pins whose numbers are neither contiguous nor necessarily sequential. To do this is, you can put the pin numbers in an array and then use for loops to iterate over the array.
This example makes use of 6 LEDs connected to the pins 2 - 7 on the board using 220 Ohm resistors, just like in the For Loop. However, here the order of the LEDs is determined by their order in the array, not by their physical order.
This technique of putting the pins in an array is very handy. You don't have to have the pins sequential to one another, or even in the same order. You can rearrange them however you want.
Hardware Requirements :
Arduino Board
(6) 220 ohm resistors
(6) LEDs
hook-up wire
breadboard
Circuit :
Code :
int timer = 100; // The higher the number, the slower the timing.
int ledPins[] = {
2, 7, 4, 6, 5, 3 }; // an array of pin numbers to which LEDs are attached
int pinCount = 6; // the number of pins (i.e. the length of the array)
void setup() {
// the array elements are numbered from 0 to (pinCount - 1).
// use a for loop to initialize each pin as an output:
for (int thisPin = 0; thisPin < pinCount; thisPin++) {
pinMode(ledPins[thisPin], OUTPUT);
}
}
void loop() {
// loop from the lowest pin to the highest:
for (int thisPin = 0; thisPin < pinCount; thisPin++) {
// turn the pin on:
digitalWrite(ledPins[thisPin], HIGH);
delay(timer);
// turn the pin off:
digitalWrite(ledPins[thisPin], LOW);
}
// loop from the highest pin to the lowest:
for (int thisPin = pinCount - 1; thisPin >= 0; thisPin--) {
// turn the pin on:
digitalWrite(ledPins[thisPin], HIGH);
delay(timer);
// turn the pin off:
digitalWrite(ledPins[thisPin], LOW);
}
}
Contents Source : www.arduino.cc

No comments:
Post a Comment